


Como es otra de las cosas que tenemos idea de hacerle en la revisión de los 80.000 Kms y no recuerdo que se haya hablado del tema, pongo aquí un brico que me acabo de encontrar:
http://s2000.com/for...uel-filter.html
hi guys i was looking for ages trying to find a tutorial on how to change my filter so i just gave up and made my own, this is my first ever tutorial so go easy on me.
Equipment List
*Basic understanding of clips useful
*Flat blade screwdriver set
*1/4" rachet and socket set (or 3/8" or 1/2" doesnt really matter just if you had to go out and buy the set 1/4" would probably be cheapest, and i prefer them, also it is possible to use a Phillips head screwdriver, but this leaves the risk of stripping the centre of the bolts, as they can be quite tight)
*Pliers
Disclaimer: I accept no liability If you somehow manage to damage your car using this tutorial. =D
First step would be having the correct parts, this main body is the most vital part but the kit from honda does come with some new wiring.
For the next part we must access the trunk and remove the spare tire which makes things alot easier for you.
next step is to start releasing all the clips holding the soft top trim thing in.
there are 4 of these white clips along the outside edge squeeze the sides and push them up into the car slightly.
There is 2 more clips on the each far side of the trim that you need to remove this picture is after i have already done the install i put the clip in backwards so its easier for next time but fiddle around with the bottom of the clip untill it goes up and out of its hole.
Now to inside the car done so with the soft top up for obvious reasons. We need to remove the top rear part of the trim there are 3 push button clips released by pushing in the centre of them.
Then go ahead and remove the push button clips 2 are against the back of the rollbars/seats.
Next is removing the base panel from the car, pull up on the rear untill it becomes free, then manouvre it through the front and out the door.
Now we can see the fuel filter cover =) so go ahead and remove those 3 screws and also it is easier to work on if you push the grommet through the plating to get the plating out of the way (sharp edges).
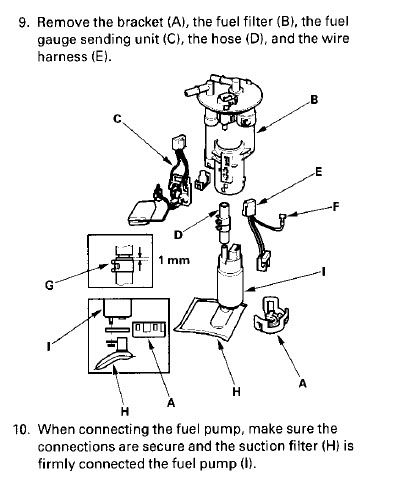
You are now presented with your fuel filter. Disconnect the wiring connector, pop your fuel door and remove the cap, try and crank your car over untill it wont start anymore then crank it a little more however it is best for your starter motor not to crank for anymore then say 5 or 6 seconds at a time, these steps were to reduce or remove residual fuel pressure in the lines (otherwise removing the fuel line results in alot of mess and people getting high).There are 8 (i think they were 3/16 because my 8mm was slipping on them) bolts and 1 nut (10mm), then disconnect the 2 fuel lines by squeezing the white portion of the connector inwards and pushing/pulling the line off.
Now lift your fuel filter out of the tank manouvering it not to damage your fuel level float (involves tilting at angles ect) and place into a container as to not drip fuel through your car.
Now remove the bottom cap and rubber thing on base of fuel pump (retain the rubber thing as you dont get a new one)
Go ahead and start disconnecting connectors and removing your fuel level float done so by sliding the main part of the float assembly downwards and off.
Get a pair of pliers and release and slide the metal clamp holding the hose connecting the main body to the pump.
Making sure you have removed the connector from the top of your fuel pump pull the pump out from the bottom.
Next remove the top metal and rubber rings on the main body (dont really have to be to careful about the retaining plastic things as they are on the new assembly)
Now refit all you have removed to the new main body and youll have somthing that looks like this also inspect where your fuel level float contacts to make sure its still contacting and not bent away. also when refitting the top rings make sure the rubber dowels line up with the holes on the metal ring and the metal ring clicks into place properly (dont worry only one way it can go)
Remove the 2 white connecting parts off the top of the old main body and fit to the new one.
Making sure all connectors are connected place your fuel filter back into your tank and tighten down the 8 bolts and nut, in diagonal sequence as to not distort anything. Plug your connector and fuel lines back on, Start your car and check for leaks, giving no leaks put the rest of your car back together...
all done, hope this helps someone and im always looking for ways to improve as this is my first time doing a tutorial.


Buff! Menudo sitio más rebuscado para ubicar el filtro y tener que trabajar ahí!


