Ir al contenido

Club HondaSpirit uses cookies. Read the Política de Privacidad for more info. To remove this message, please click the button to the right:    I accept the use of cookies

Foto

Cambio del Filtro de Gasolina


  • Por favor identifícate para responder
36 respuestas en este tema

#1 Storm

Storm

    Asimo Pro

  • Miembros
  • 12,126 mensajes
  • Gender:Male
  • Location:At The Heart Of Winter
  • Coche:2005 Honda S2000

Escrito 21 October 2011 - 08:19:30

Muy buenas,
Como es otra de las cosas que tenemos idea de hacerle en la revisión de los 80.000 Kms y no recuerdo que se haya hablado del tema, pongo aquí un brico que me acabo de encontrar:

http://s2000.com/for...uel-filter.html

hi guys i was looking for ages trying to find a tutorial on how to change my filter so i just gave up and made my own, this is my first ever tutorial so go easy on me.

Equipment List
*Basic understanding of clips useful
*Flat blade screwdriver set
*1/4" rachet and socket set (or 3/8" or 1/2" doesnt really matter just if you had to go out and buy the set 1/4" would probably be cheapest, and i prefer them, also it is possible to use a Phillips head screwdriver, but this leaves the risk of stripping the centre of the bolts, as they can be quite tight)
*Pliers

Disclaimer: I accept no liability If you somehow manage to damage your car using this tutorial. =D

First step would be having the correct parts, this main body is the most vital part but the kit from honda does come with some new wiring.

Imagen Enviada

For the next part we must access the trunk and remove the spare tire which makes things alot easier for you.

Imagen Enviada

next step is to start releasing all the clips holding the soft top trim thing in.
there are 4 of these white clips along the outside edge squeeze the sides and push them up into the car slightly.

Imagen Enviada

There is 2 more clips on the each far side of the trim that you need to remove this picture is after i have already done the install i put the clip in backwards so its easier for next time but fiddle around with the bottom of the clip untill it goes up and out of its hole.

Imagen Enviada

Now to inside the car done so with the soft top up for obvious reasons. We need to remove the top rear part of the trim there are 3 push button clips released by pushing in the centre of them.

Imagen Enviada

Then go ahead and remove the push button clips 2 are against the back of the rollbars/seats.

Imagen Enviada

Next is removing the base panel from the car, pull up on the rear untill it becomes free, then manouvre it through the front and out the door.

Imagen Enviada

Imagen Enviada

Now we can see the fuel filter cover =) so go ahead and remove those 3 screws and also it is easier to work on if you push the grommet through the plating to get the plating out of the way (sharp edges).

Imagen Enviada

You are now presented with your fuel filter. Disconnect the wiring connector, pop your fuel door and remove the cap, try and crank your car over untill it wont start anymore then crank it a little more however it is best for your starter motor not to crank for anymore then say 5 or 6 seconds at a time, these steps were to reduce or remove residual fuel pressure in the lines (otherwise removing the fuel line results in alot of mess and people getting high).There are 8 (i think they were 3/16 because my 8mm was slipping on them) bolts and 1 nut (10mm), then disconnect the 2 fuel lines by squeezing the white portion of the connector inwards and pushing/pulling the line off.

Imagen Enviada

Now lift your fuel filter out of the tank manouvering it not to damage your fuel level float (involves tilting at angles ect) and place into a container as to not drip fuel through your car.
Now remove the bottom cap and rubber thing on base of fuel pump (retain the rubber thing as you dont get a new one)

Imagen Enviada

Go ahead and start disconnecting connectors and removing your fuel level float done so by sliding the main part of the float assembly downwards and off.

Imagen Enviada

Get a pair of pliers and release and slide the metal clamp holding the hose connecting the main body to the pump.

Imagen Enviada

Imagen Enviada

Making sure you have removed the connector from the top of your fuel pump pull the pump out from the bottom.
Next remove the top metal and rubber rings on the main body (dont really have to be to careful about the retaining plastic things as they are on the new assembly)

Imagen Enviada

Now refit all you have removed to the new main body and youll have somthing that looks like this also inspect where your fuel level float contacts to make sure its still contacting and not bent away. also when refitting the top rings make sure the rubber dowels line up with the holes on the metal ring and the metal ring clicks into place properly (dont worry only one way it can go)

Imagen Enviada

Imagen Enviada

Imagen Enviada

Remove the 2 white connecting parts off the top of the old main body and fit to the new one.

Imagen Enviada

Making sure all connectors are connected place your fuel filter back into your tank and tighten down the 8 bolts and nut, in diagonal sequence as to not distort anything. Plug your connector and fuel lines back on, Start your car and check for leaks, giving no leaks put the rest of your car back together...
all done, hope this helps someone and im always looking for ways to improve as this is my first time doing a tutorial.


Buff! Menudo sitio más rebuscado para ubicar el filtro y tener que trabajar ahí!

#2 dani2000

dani2000

    K20C (ep3) 200 hp

  • Miembros
  • 183 mensajes
  • Coche:S2000

Escrito 21 October 2011 - 09:13:32

Buff esto cambiado en la casa en mano de obra te pegan el polvazo...

Toca cada 80.000km?? Joer otra cosa mas que le debe tocar al mio! :uff:

#3 edu_lafabrica

edu_lafabrica

    Asimo

  • Miembros
  • 1,462 mensajes
  • Gender:Male
  • Location:barcelona
  • Coche:s2000, Triumph Street Triple R

Escrito 21 October 2011 - 09:18:12

Bueno por lo que se be en las imágenes este tío saca la bomba y no cambia el filtro!!!! realmente no creo que sea tan difícil, lo que parece engorroso por tener todo el tema de la consola trasera por el medio.

P.D. Tendre que plantearme cambiar el filtro pronto...

#4 Storm

Storm

    Asimo Pro

  • Miembros
  • 12,126 mensajes
  • Gender:Male
  • Location:At The Heart Of Winter
  • Coche:2005 Honda S2000

Escrito 21 October 2011 - 09:40:13

Buff esto cambiado en la casa en mano de obra te pegan el polvazo...
Toca cada 80.000km?? Joer otra cosa mas que le debe tocar al mio! :uff:

No, no me he fijado cuando toca pero el tema es que al nuestro no se le ha cambiado NUNCA (y tiene 81.500 Kms).
Si vemos que es mucha liada y no nos da tiempo, lo dejaremos para más adelante pero, tarde o temprano, habrá que hacerlo.

Bueno por lo que se be en las imágenes este tío saca la bomba y no cambia el filtro!!!! realmente no creo que sea tan difícil, lo que parece engorroso por tener todo el tema de la consola trasera por el medio.
P.D. Tendre que plantearme cambiar el filtro pronto...

Sí, el problema es acceder hasta ahí, la verdad.
Edu, el tío sí que cambia el filtro, se ve en estas fotos:

Lo suelta:

Imagen Enviada

Imagen Enviada

Se ven los dos:

Imagen Enviada

Usa unos conectores del viejo:

Imagen Enviada


#5 S2000Gr

S2000Gr

    ___9555 rpm___

  • Miembros
  • 7,842 mensajes
  • Gender:Male
  • Location:Granada
  • Interests:No conviene pedir peras al olmo.
  • Coche:S2000

Escrito 21 October 2011 - 09:54:03

Yo lo cambié aprovechando el cambio de capota.

Lo cierto es que según el manual, no hay un tiempo ni unos kms determinados para cambiarlo. Lo que dice Honda es que se cambie cuando se aprecie que la bomba precisa más de nosecuanta potencia eléctrica para manterner el flujo de gasolina, lo cual es indicativo de que el filtro comienza a ofrecer más resistencia de la normal debido a la obturación. Mientras no se traspase ese umbral de no sé cuantos voltios o watios o lo que demonios sea, entonces no hace falta cambiar nada.

#6 Storm

Storm

    Asimo Pro

  • Miembros
  • 12,126 mensajes
  • Gender:Male
  • Location:At The Heart Of Winter
  • Coche:2005 Honda S2000

Escrito 21 October 2011 - 11:07:20

Yo lo cambié aprovechando el cambio de capota.
Lo cierto es que según el manual, no hay un tiempo ni unos kms determinados para cambiarlo. Lo que dice Honda es que se cambie cuando se aprecie que la bomba precisa más de nosecuanta potencia eléctrica para manterner el flujo de gasolina, lo cual es indicativo de que el filtro comienza a ofrecer más resistencia de la normal debido a la obturación. Mientras no se traspase ese umbral de no sé cuantos voltios o watios o lo que demonios sea, entonces no hace falta cambiar nada.

Y cómo te diste cuenta de que tocaba? O fué, simplemente, aprovechando que tocaba desmontar todo?
Algún comentario o aclaración al brico?

Editado por Storm, 21 October 2011 - 11:07:53.


#7 S2000Gr

S2000Gr

    ___9555 rpm___

  • Miembros
  • 7,842 mensajes
  • Gender:Male
  • Location:Granada
  • Interests:No conviene pedir peras al olmo.
  • Coche:S2000

Escrito 21 October 2011 - 11:12:44

No, no. Lo hice en plan "poyaque", es decir, no hacía falta en ese momento, pero a la vista de que tenía el coche en el concesionario con toda la parte de atrás desmontada por el cambio a capota con cristal, y viendo el follón que hay que organizar para cambiar el filtro, pregunté cuánto valía y me pareció que por 30 o 40 euros, ya no me acuerdo bien, merecia la pena cambiarlo y tenerlo nuevo para una temporada larga. En aquel momento el coche tenía 70k kms, más o menos, y según el mecánico no hubiera hecho falta cambiarlo aún. De todos modos, como digo, ya que estaba fácil, pues aproveché para ponerlo nuevo.

Editado por S2000Gr, 21 October 2011 - 11:13:17.


#8 Storm

Storm

    Asimo Pro

  • Miembros
  • 12,126 mensajes
  • Gender:Male
  • Location:At The Heart Of Winter
  • Coche:2005 Honda S2000

Escrito 21 October 2011 - 11:16:21

No, no. Lo hice en plan "poyaque", es decir, no hacía falta en ese momento, pero a la vista de que tenía el coche en el concesionario con toda la parte de atrás desmontada por el cambio a capota con cristal, y viendo el follón que hay que organizar para cambiar el filtro, pregunté cuánto valía y me pareció que por 30 o 40 euros, ya no me acuerdo bien, merecia la pena cambiarlo y tenerlo nuevo para una temporada larga. En aquel momento el coche tenía 70k kms, más o menos, y según el mecánico no hubiera hecho falta cambiarlo aún. De todos modos, como digo, ya que estaba fácil, pues aproveché para ponerlo nuevo.

Aclarado, muchas gracias!

Aprovecho para añadir más info:

http://www.s2ki.com/...91-fuel-filter/

Imagen Enviada

To make a long story short nick2000 the EUROSERIVE schedule for our S's fuel filter is every 36,000 Km. Dont worry about the cost... its minimal.


There is small space to do that. You can also access that particular spot from the trunk once you remove the trim but there is not enough space to do any work.
So thats why you remove the rear tray of the soft top without removing the soft top itself.


Pardon me for butting in. I have changed the fuel "sock". (It's really not a proper fuel filter but that's all there is on this car.)
You don't have to remove the soft top to get at the rear tray. If you have the wind deflector, then you must remove this so you can lay across the cover of the secret compartment. It's very tight to work in there but that's the way it's done.
-Remove the trim
-Undo the tray
-Remove the liner in the trunk
-Pull the tray out through the trunk
-Work from above to remove the fuel pump
-Don't drop anything into the fuel tank
-Don't blow yourself up.


http://www.s2ki.com/...rvice-schedule/

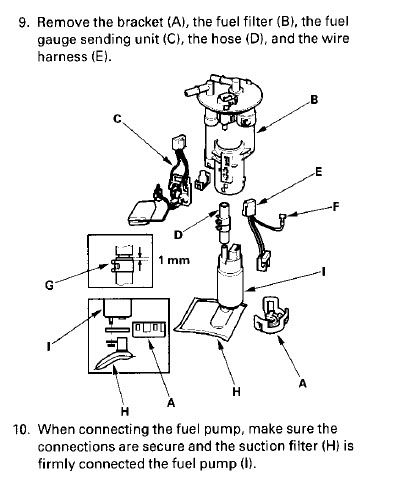
Imagen Enviada

I was given part 'B' ("fuel filter") but after receiving it it seems the actual filtration part would be part 'H' in that diagram ("suction filter")
Am I right in saying H needs to be replaced, but not A?


Nota: Supongo que quiere preguntar si hay que cambiar el H y no el B, que es la pieza que le dieron.

looks like a misprint.
H is definitely the fuel filter.
then again, I am not sure if there is a secondary filter in the housing B.


Well nobody has done one in these parts as the filter in part B is a lifetime filter in North America and most of the world. I've only heard of it being replaced in Australia. Part H is the pre-filter for the fuel pump, there is a larger more dense filter inside part B. Why they want it replaced in Australia is anyone's guess ?. In our parts people go hundreds of thousands of miles and never have to change that part, the car usually dies before that filter needs replacement. It's not part of any maintenance schedule here.


Billman, The same part labelled as part 'B' (fuel filter) is labelled as the 'fuel filter' in other diagrams in the service manual too, so I don't think it's a misprint.
However the part they've given me [B] has no visible filtration media in it - I don't see how it would act as a fuel filter. Maybe I need to look more closely.
So to confirm it's part [H] - the suction filter - that needs replacing? How much does it usually set you guys back $$?


Over here (London) the filter is replaced only if fuel pressure drops below the spec range, which is very rare and I'd guess 99.99% of North American S2K's never end up in this situation, thus few people here would have experience with it.
Part B is worth about $60 US and Part H is worth about $23 US from majestichonda.com .
There was a post on this a month or two ago from an Australian member making the inquiry, unless that was you ?. Check the new part thoroughly with a flashlight in the entry and exit ports and see if you can detect a filter inside the housing of part B ?. My understanding is that it does have a filter but it is a part that is rarely changed - designed as a lifetime filter. My shop manual calls it part A - fuel filter, the lower part is list as a suction filter.


Editado por Storm, 21 October 2011 - 11:47:05.


#9 edu_lafabrica

edu_lafabrica

    Asimo

  • Miembros
  • 1,462 mensajes
  • Gender:Male
  • Location:barcelona
  • Coche:s2000, Triumph Street Triple R

Escrito 21 October 2011 - 11:53:56

No, no me he fijado cuando toca pero el tema es que al nuestro no se le ha cambiado NUNCA (y tiene 81.500 Kms).
Si vemos que es mucha liada y no nos da tiempo, lo dejaremos para más adelante pero, tarde o temprano, habrá que hacerlo.


Sí, el problema es acceder hasta ahí, la verdad.
Edu, el tío sí que cambia el filtro, se ve en estas fotos:


Si te fijar lo que cambia es la bomba que es el "cilindro" de plastico negro, el filtro es ese "cojin" que se ve de un color amarillento.

#10 dani2000

dani2000

    K20C (ep3) 200 hp

  • Miembros
  • 183 mensajes
  • Coche:S2000

Escrito 21 October 2011 - 12:12:40

Estos post son una tortura, creo que uno es más feliz con la ignorancia. Ahora me dejais con la mosca tras la oreja. Y encima no es un brico asi fácil fácil... :eing:

#11 Storm

Storm

    Asimo Pro

  • Miembros
  • 12,126 mensajes
  • Gender:Male
  • Location:At The Heart Of Winter
  • Coche:2005 Honda S2000

Escrito 21 October 2011 - 13:52:46

Si te fijas lo que cambia es la bomba que es el "cilindro" de plastico negro, el filtro es ese "cojin" que se ve de un color amarillento.

Joer, tengo que leer todo ésto más despacio y con tiempo.

Estos post son una tortura, creo que uno es más feliz con la ignorancia. Ahora me dejais con la mosca tras la oreja. Y encima no es un brico asi fácil fácil... :eing:

Pues, sí. Yo pensaba que sería algo sencillo pero veo que tiene su complicación y no sé si merece ponernos con ésto ahora que andamos liados con más cosas.

#12 dani2000

dani2000

    K20C (ep3) 200 hp

  • Miembros
  • 183 mensajes
  • Coche:S2000

Escrito 21 October 2011 - 17:35:14

Ya te digo...

Perdón por el offtopic pero tu firma con el coche de lado me ha recordado que el coche para mi es precioso de frente de atras de arriba, de lado, en oblicuo, pero cuando lo veo de lado a distancia me parece feo!! No os pasa igual? Yo soy de los que cuando se baja del coche me lo remiro un rato, pero es que tiene un angulo feuchillo comparado con todos los demas que me enamoran. Quizá con tanta presión de aceites y demás ya esté perdiendo la cebolleta... :crazy:

#13 Storm

Storm

    Asimo Pro

  • Miembros
  • 12,126 mensajes
  • Gender:Male
  • Location:At The Heart Of Winter
  • Coche:2005 Honda S2000

Escrito 21 October 2011 - 19:17:15

Ya te digo...
Perdón por el offtopic pero tu firma con el coche de lado me ha recordado que el coche para mi es precioso de frente de atras de arriba, de lado, en oblicuo, pero cuando lo veo de lado a distancia me parece feo!! No os pasa igual? Yo soy de los que cuando se baja del coche me lo remiro un rato, pero es que tiene un angulo feuchillo comparado con todos los demas que me enamoran. Quizá con tanta presión de aceites y demás ya esté perdiendo la cebolleta... :crazy:

Fíjate en las fotos de mi firma, a mí me gusta desde ese ángulo (más o menos), la verdad.

Editado por Storm, 21 October 2011 - 19:17:34.


#14 Storm

Storm

    Asimo Pro

  • Miembros
  • 12,126 mensajes
  • Gender:Male
  • Location:At The Heart Of Winter
  • Coche:2005 Honda S2000

Escrito 21 March 2012 - 18:21:51

Pues, sí. Yo pensaba que sería algo sencillo pero veo que tiene su complicación y no sé si merece ponernos con ésto ahora que andamos liados con más cosas.

Bueno, refloto el tema porque acabo de pedir el dichoso filtro en la Honda (41, 58 € con IVA) y me tocará curro + brico.
Ya os contaré.

Editado por Storm, 21 March 2012 - 18:22:40.


#15 Storm

Storm

    Asimo Pro

  • Miembros
  • 12,126 mensajes
  • Gender:Male
  • Location:At The Heart Of Winter
  • Coche:2005 Honda S2000

Escrito 27 March 2012 - 18:59:05

Bueno, refloto el tema porque acabo de pedir el dichoso filtro en la Honda (41, 58 € con IVA) y me tocará curro + brico.
Ya os contaré.

Lo acabo de recoger:

Imagen Enviada

Imagen Enviada

Imagen Enviada

P.D: Corrijo, 41,51 € con Iva.

Editado por Storm, 27 March 2012 - 19:06:49.


#16 S2000Gr

S2000Gr

    ___9555 rpm___

  • Miembros
  • 7,842 mensajes
  • Gender:Male
  • Location:Granada
  • Interests:No conviene pedir peras al olmo.
  • Coche:S2000

Escrito 27 March 2012 - 19:28:10

Con dos cojones. Ya hay que tener valor pa meterse en un fregao así, ya...

Ánimo, ánimo, jojojojojojojo.

#17 Storm

Storm

    Asimo Pro

  • Miembros
  • 12,126 mensajes
  • Gender:Male
  • Location:At The Heart Of Winter
  • Coche:2005 Honda S2000

Escrito 27 March 2012 - 20:29:01

Con dos cojones. Ya hay que tener valor pa meterse en un fregao así, ya...
Ánimo, ánimo, jojojojojojojo.

Puff! Ya puestos!
Podría montar un puto circo con los enanos que me han salido desde comienzos de año!

Imagen Enviada

P.D: Nadie sabrá cómo comprar una ametralladora por eBay, no?
Ja, ja, ja!!!

#18 Storm

Storm

    Asimo Pro

  • Miembros
  • 12,126 mensajes
  • Gender:Male
  • Location:At The Heart Of Winter
  • Coche:2005 Honda S2000

Escrito 28 March 2012 - 20:21:06

Puff! Ya puestos!

Bueno, mañana nos pondremos a éllo.
Me gusta el brico del americano éste pero habrá detalles "con sorpresa" fijo.
A ver si saco un brico decente y en cristiano!
P.D: Sí, vamos a hacer huelga a la japonesa, sí! Ja, ja, ja!!!

Editado por Storm, 28 March 2012 - 20:22:10.


#19 Storm

Storm

    Asimo Pro

  • Miembros
  • 12,126 mensajes
  • Gender:Male
  • Location:At The Heart Of Winter
  • Coche:2005 Honda S2000

Escrito 30 March 2012 - 11:14:01

Bueno, mañana nos pondremos a éllo.
Me gusta el brico del americano éste pero habrá detalles "con sorpresa" fijo.
A ver si saco un brico decente y en cristiano!
P.D: Sí, vamos a hacer huelga a la japonesa, sí! Ja, ja, ja!!!

Bueno, pues ya está hecho!
Tardamos alrededor de una hora y no hace falta desmontar la bandeja que hay detrás de los asientos ya que en ningún momento trabajamos desde dentro del coche (sólamente mejora la visión de lo que estamos haciendo y me sirvió para sacar fotos desde arriba). Voy poniendo fotos y tengo idea de mejorar el brico del americano:

-Pedido del kit de cambio de filtro de gasolina:

Imagen Enviada

Imagen Enviada

Imagen Enviada

Imagen Enviada

-Empezamos a desmontar el maletero sacando la rueda de repuesto:

Imagen Enviada

-Vamos soltando los clips de la moqueta interior del maletero. Hay 4 clips blancos que se sueltan apretándolos.

Imagen Enviada

-Otros dos clips a los extremos:

Imagen Enviada

-A pesar de que no creo necesario desmontar la bandeja de detrás de los asientos, lo pongo aquí.
Con el techo levantado, soltamos los 3 clips presionando por el centro.

Imagen Enviada

-Hay otros dos clips detrás de los asientos:

Imagen Enviada

-Levantamos la bandeja desde detrás y la giramos para sacarla entre los reposacabezas:

Imagen Enviada

Imagen Enviada

-Zona donde vamos a trabajar:

Imagen Enviada

Ahora podemos ver la tapa del filtro desde arriba (antes la veíamos desde el maletero)

Imagen Enviada

-Empezamos quitando los 3 tornillos que sujetan la tapa y apartándola con cuidado de no tirar del cable que la atraviesa:
Nosotros, simplemente la apartamos para poder trabajar sin quitarle el cable.

Imagen Enviada

Imagen Enviada

Imagen Enviada

-Ahora podemos ver la parte superior del conjunto del filtro con el conector de corriente y los dos latiguillos de combustible:

Imagen Enviada

Los desconectamos colocando los latiguillos en altura para evitar que pierdan gasolina.

-Una vez soltados, quitamos los 8 tornillos que sujetan el conjunto de la bomba sobre el depósito:

Imagen Enviada

Imagen Enviada

Imagen Enviada

Imagen Enviada

Imagen Enviada

Imagen Enviada

Imagen Enviada

-Sacamos el conjunto de la bomba sobre un cubo para evitar manchar el interior del coche con gasolina:

Imagen Enviada

Imagen Enviada

-Detalle del depósito sin el conjunto de la bomba:

Imagen Enviada

-Aquí tenemos el conjunto de la bomba:

Imagen Enviada

Imagen Enviada

Imagen Enviada

Imagen Enviada

Imagen Enviada

Imagen Enviada

Imagen Enviada

Imagen Enviada

Imagen Enviada

Imagen Enviada

Imagen Enviada

Imagen Enviada

-Empezamos a desarmarlo para cambiar el cuerpo:

Debemos desconectar la pieza que lleva el filtro cuadrado, el nivel de gasolina, el conector eléctrico y el tubo de goma que va fijado con la abrazadera.


You are now presented with your fuel filter. Disconnect the wiring connector, pop your fuel door and remove the cap, try and crank your car over untill it wont start anymore then crank it a little more however it is best for your starter motor not to crank for anymore then say 5 or 6 seconds at a time, these steps were to reduce or remove residual fuel pressure in the lines (otherwise removing the fuel line results in alot of mess and people getting high).There are 8 (i think they were 3/16 because my 8mm was slipping on them) bolts and 1 nut (10mm), then disconnect the 2 fuel lines by squeezing the white portion of the connector inwards and pushing/pulling the line off.


Now lift your fuel filter out of the tank manouvering it not to damage your fuel level float (involves tilting at angles ect) and place into a container as to not drip fuel through your car.
Now remove the bottom cap and rubber thing on base of fuel pump (retain the rubber thing as you dont get a new one)

Imagen Enviada

Go ahead and start disconnecting connectors and removing your fuel level float done so by sliding the main part of the float assembly downwards and off.

Imagen Enviada

Get a pair of pliers and release and slide the metal clamp holding the hose connecting the main body to the pump.

Imagen Enviada

Imagen Enviada

Making sure you have removed the connector from the top of your fuel pump pull the pump out from the bottom.
Next remove the top metal and rubber rings on the main body (dont really have to be to careful about the retaining plastic things as they are on the new assembly)

Imagen Enviada

Now refit all you have removed to the new main body and youll have somthing that looks like this also inspect where your fuel level float contacts to make sure its still contacting and not bent away. also when refitting the top rings make sure the rubber dowels line up with the holes on the metal ring and the metal ring clicks into place properly (dont worry only one way it can go)

Imagen Enviada

Imagen Enviada

Imagen Enviada

Remove the 2 white connecting parts off the top of the old main body and fit to the new one.

Imagen Enviada

Making sure all connectors are connected place your fuel filter back into your tank and tighten down the 8 bolts and nut, in diagonal sequence as to not distort anything. Plug your connector and fuel lines back on, Start your car and check for leaks, giving no leaks put the rest of your car back together...
all done, hope this helps someone and im always looking for ways to improve as this is my first time doing a tutorial.

-La bomba que va alojada dentro del cuerpo del filtro:

Imagen Enviada

-Detalle de cómo va fijada la base del nivel de gasolina al cuerpo del filtro:

Imagen Enviada

-Vamos soltando cosas del cuerpo viejo:

Imagen Enviada

Imagen Enviada

Imagen Enviada

-Empezamos a armar el nuevo:

Imagen Enviada

Imagen Enviada

Imagen Enviada

Imagen Enviada

Imagen Enviada

Imagen Enviada

-Nueva abrazadera con la pieza que la mantiene abierta:

Imagen Enviada

Imagen Enviada

Imagen Enviada

Imagen Enviada

Imagen Enviada

Imagen Enviada

Imagen Enviada

Imagen Enviada

-Detalles del conector eléctrico:

Imagen Enviada

Imagen Enviada

Imagen Enviada

Imagen Enviada

Como no podía ser de otra forma, aquí viene la sorpresa!
El nuevo conector tiene dos cables a masa (el antiguo tenía uno) y hay que fijar el "nuevo" a una patilla que tiene el cuerpo del filtro cerca de su parte superior para que, creemos, haga masa con el chásis del coche:

Imagen Enviada

Imagen Enviada

Imagen Enviada

-Lo que nos sobra:

Imagen Enviada

-Volvemos a poner el conjunto de la bomba en su sitio:

Imagen Enviada

Imagen Enviada

-Una vez todo en su sitio (8 tornillos, conector eléctrico y latiguillos de gasolina), ponemos el contacto y oiremos el motor de la bomba. Arrancamos el coche y comprobamos la zona en busca de posibles fugas antes de poner la última tapa.

A pesar de lo que parece, es relativamente sencillo si no fuese por el engorro de tener que soltar el maletero y tener que currar doblado con una p#%@ culebra! Ja, ja, ja!!!

P.D: Detalles del maletero desmontado:

Imagen Enviada

Imagen Enviada

Imagen Enviada

Imagen Enviada

Imagen Enviada

Imagen Enviada

Imagen Enviada

Imagen Enviada

Imagen Enviada

Imagen Enviada

Imagen Enviada

Imagen Enviada

Imagen Enviada

Imagen Enviada

Imagen Enviada

Editado por Storm, 17 April 2012 - 11:34:21.


#20 Storm

Storm

    Asimo Pro

  • Miembros
  • 12,126 mensajes
  • Gender:Male
  • Location:At The Heart Of Winter
  • Coche:2005 Honda S2000

Escrito 08 February 2015 - 23:46:16

Bueno, pues ya está hecho!


Vaya, veo que debería volver a subir todas las fotos pero, por ahora, subo las del maletero desmontado:

http://clubhondaspir...aletero S 1.jpg

http://clubhondaspir...aletero S 2.jpg

http://clubhondaspir...aletero S 3.jpg


1 usuarios están leyendo este tema

0 miembros, 1 invitados, 0 usuarios anónimos