Iniciar sesión
 Crear una cuenta

EMPEZAMOS :
PARTE IZQUERDA
1.
 013.JPG 560,69KB
63 descargas
013.JPG 560,69KB
63 descargasEsta es la heramienta que he usado yo.
2
021.JPG 1000,8KB
54 descargas
020.JPG 1,23MB
43 descargas
023.JPG 1,34MB
38 descargas
024.JPG 1,96MB
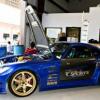
31 descargas Para tener espacio y acceso en la parte trasera de faro tenemos q sacar esta parte del tanque de limpi parbrisa. Hay q acerlo muy suave y sin prisa para no romperlo.No es necesario sacar el tanque de limpia y de toda manera es casi imposible por q lleva 3 tornillo por debajo y hay que quitar el guardabaro ....etc .
3. Sacamos la tapa trasera del faro y hacemos un agujero por el lateral en la parte baja. POR QUE EN LA PARTE BAJA? Porque asi hay menos riesgo que entre agua o liquidos. Por alli sacamos los cables y metemos la goma que viene con el kit , asi evitamos que no entre polvo , aqua. La goma se le tiene que cortar los bordillos para que quede un poco cuadrada y asi no se dobla , sobresale y se pueda cerar la tapa.
026.JPG 1,81MB
32 descargas
027.JPG 1,7MB
34 descargas
027.JPG 1,7MB
34 descargas
028.JPG 1,38MB
29 descargas
035.JPG 825,66KB
35 descargas
034.JPG 808,2KB
42 descargas
030.JPG 1,2MB
42 descargas .4. Separamos los cables azul y negro sacandola de la goma. Metemos luego la goma con los dos cables rojo y negro y.Despues metemos otravez los cables azul y negro sin problemas por que la goma es muy flexible y hacemos las conexiones entre lo cables + y - del coche. POR QUE METEMOS LA GOMA SIN LOS CABLES AZUL Y NEGRU? Por que en el agujero de la tapa q no es muy grande no pasan los enchufes junto con los cables por muy poco espacio.En final ceramos la tapa q deberia cerarse sin problemas. Luego hacemos las conexiones entre los cables del balastro y los que salen del faro.
036.JPG 180,3KB
49 descargas
037.JPG 1,19MB
48 descargas
038.JPG 1,15MB
49 descargas
040.JPG 1,27MB
49 descargas
039.JPG 714,36KB
55 descargas
044.JPG 456,06KB
50 descargas
045.JPG 1,29MB
44 descargas 5. Ahora seguimos
047.JPG 771,39KB
46 descargas
049.JPG 238,69KB
41 descargas
050.JPG 283,65KB
46 descargasPonemos el balastro justo detras de la tapa por no tener mas opsiones de ponerlo. Yo lo enganche con una brida metita por el agujero q esta e detras del balastro en la parte de ariba. Metemos la parte del tanque de limpia parbrisa empujando con cuIdado casi enroscando. YYYYYYYYY LIIIISTOOOOOO
 !!!!!
!!!!! PARTE DERECHA
015.JPG 168,16KB
40 descargas
018.JPG 481,41KB
39 descargasEn la parte derecha la instalacion es igual que en otro lado y mucho mas facil .El balastro lo tuve q poner al lado de la bateria por lo mismo, falta de espacio. IDEAS?

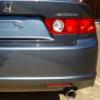
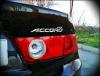
Ahora vamos aver unas fotos y la comparacion del nivel y de la intensidad del xeno. Hemos puesto mi ACCORD paralelo con otro ACCORD ( que esta mas bajito que el mio con 2,5 cm atras y 4 cm adelante )y que lleva las bombillas de serie.La comparacion echa en una pared en lo cual yo llevaba el NIVEL 0 y de noche
010.JPG 362,19KB
41 descargas
011.JPG 449,98KB
30 descargas
h5.JPG 74,15KB
29 descargas
h6.JPG 525,61KB
32 descargasCon NIVEL 1
HN1.JPG 491,77KB
28 descargas
HN3.JPG 375,68KB
27 descargas
HN5.JPG 1,22MB
26 descargas
HN8.JPG 657,41KB
25 descargas
HN6.JPG 763,29KB
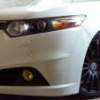
23 descargasDe día se ve con esta intensidad
052.JPG 919,84KB
36 descargas
053.JPG 474,27KB
37 descargas
054.JPG 500,32KB
32 descargas
055.JPG 469,71KB
39 descargas MUY IMPORTANTE !!! Vale la pena y menudo cambio que le da al coche.Teneis que tener en cuenta: la pasiencia,la tranquilidad, ser un poco manita, paz y amor y ....................................
 . Perdonen si he escrito mal algo o me he comido algunas letras o punctuacion
ACCEPTO IDEAS , COMENTARIOS Y RECLAMACIONE !!!!


 !!!
!!!Archivos adjuntos
Editado por danylson, 23 mayo 2011 - 21:47:40.
 Volver arriba